How do I set up VirtualPower if my trainer has more than one setting?
Magnetic and fluid trainers have variable resistance settings, and each of these settings have their own power curve (speed-to-power ratio). For more information on how these readings are derived, learn how VirtualPower works.
This graph displays each power curve for every resistance level on a single trainer. The X-axis represents speed while the Y-axis represents power measured in watts.
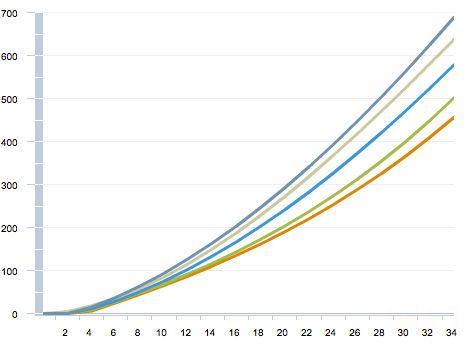
Since each resistance setting on your trainer has its own power curve, you'll need to choose which level you're training with.
How to Select a Resistance Setting
Desktop
Step 1: Pair your speed/cadence sensor in the Device section of the app
Step 2: Select Turn On next to VirtualPower, then select the Enable VirtualPower toggle
Step 3: Select the make and model for your trainer
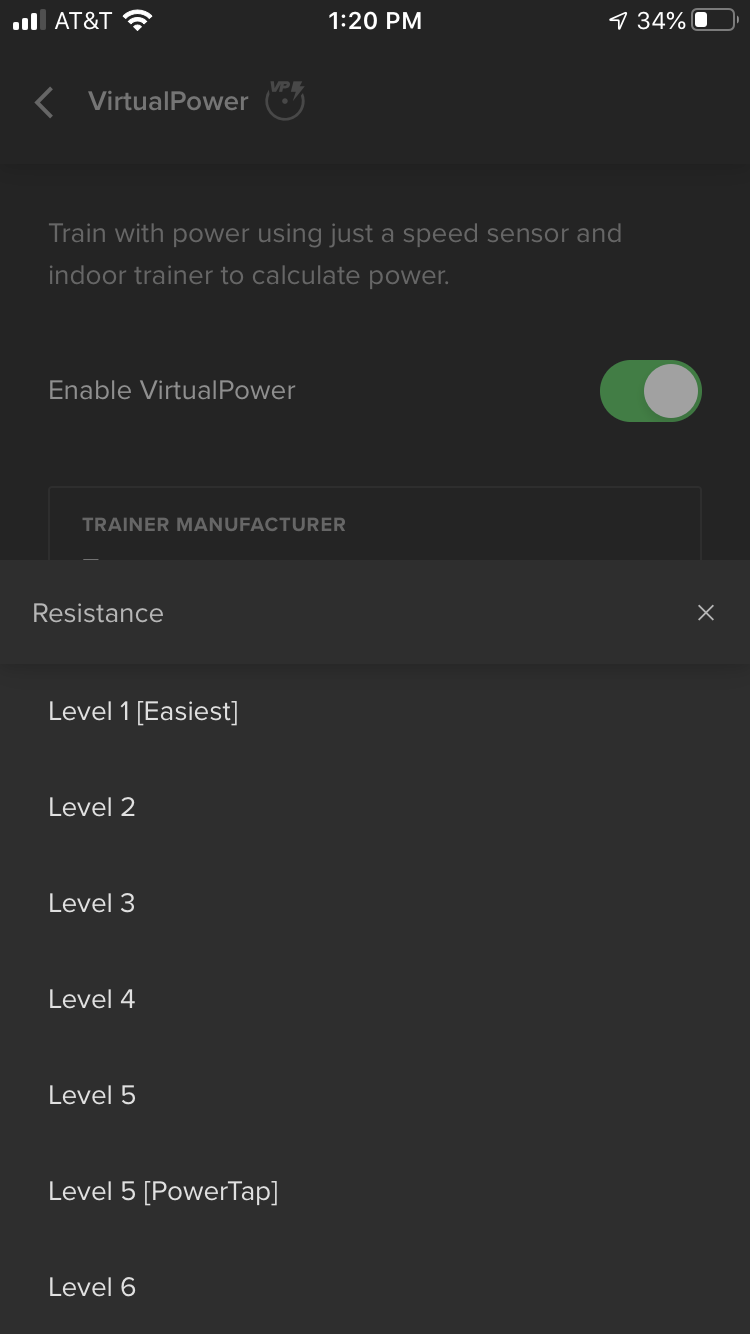
Step 4: Choose a Resistance setting (if any) from the drop-down menu
Note: Make sure the resistance setting you have on your trainer matches the selection within TrainerRoad's VirtualPower settings. If you change the setting, you'll need to change the selection in TrainerRoad.

Mobile
Step 1: Pair your speed/cadence sensor in the Device section of the app
Step 2: Select Turn On next to VirtualPower, then select the Enable VirtualPower toggle
Step 3: Select the make and model for your trainer
Step 4: Choose a Resistance setting (if any) from the drop-down menu
Note: Make sure the resistance setting you have on your trainer matches the selection within TrainerRoad's VirtualPower settings. If you change the setting, you'll need to change the selection in TrainerRoad.
Before Settling on a Setting
It's recommended that you do a couple of short test rides to familiarize yourself with the settings and which seems to work best for you if you're not familiar with your trainer and your favored resistance setting.
Ideally, you'll find a setting that allows you to shift into an easy enough gear to adequately recover but also allows you to shift into a gear that provides enough resistance for hard efforts. Generally, the mid to high resistance settings work best, as lower resistance settings tend to top out at less than 200 watts.
Once you've selected an acceptable resistance setting, you'll want to establish your fitness level in relation to that resistance setting. We recommend that your next step be an FTP test.
Thereafter, we strongly recommend that you continue to use the same resistance setting. As mentioned above, different resistance settings have different power curves. In other words, your FTP on one resistance setting may not be the same on another — even though each setting is for the same trainer.
If you eventually decide that you'd like to use a different resistance setting, we recommend that you do a new FTP test.